Sunday, 26 May 2013

Daydreamers crochet lesson No 2.

Hello fellow happy hookers, today you will be leaning the UK half treble crochet (htr) stitch.  Grab your favorite coloured DK cotton yarn and a 4mm hook & lets get going.

Like I said in lesson No 1, to get the stitch stuck firmly in your head aim to crochet an 8 inch square dishcloth.

For an 8 inch cloth you will need to chain 37 (35+2).  Refer to lesson one for the slip knot and chain instructions.

Now to begin the htc, identify the third chain stitch from the hook (its got a needle stuck in it here). 


Before you poke your hook into the 3rd chain, wrap the yarn around the hook (yarn over hook).


Once your hook is through the chain, yarn over hook again, as in the picture below.


Now pull the yarn through one (chain) leaving you with 3 stitches on your hook.


OK, you are almost there. Now yarn over hook again.


and pull the yarn through ALL 3 STITCHES.


woooooooo hoooooooo!!!!!!!
That is your first half treble crochet.
well done :)

Now keep doing it.


Remember to insert your hook under both sides of the stitch (where the needles are in the photo below)

At the end of the first row, count your stitches, you should have 35.
I'm just doing 10 because its easier to photograph.


Before you turn your work, chain 2.


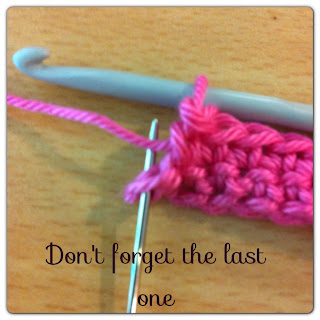
Now turn you work, ignore the 2 chain stitches, htr into each stitch going back.

don't forget the sequence
 yoh first :)  


Count as you go and don't forget the last stitch.


At the end of each row, chain 2. 
These 2 stitches are called turning chains, they keep your work nice and even at the sides.

I hope you have enjoyed this tutorial.  Feel free to leave comments or ask questions if you need help.


A little note for the crochet class students............. in the next class we will be doing the blooming flower.


For this you will be using double, half treble & treble crochet stitches.  I will try to get the treble stitch tutorial on before the lesson so you can have a practice.

Have a lovely, sunny bank holiday,

Em xx


Wednesday, 22 May 2013

Dreaming of Granny bunting tutorials.

Having two young children (3 year old girl & 12 week old boy) means that I have limited time to do things like blogging, facebook page admin, ETSY shop sorting and crafting.  I'm actually sat in bed at the mo, in the dark, typing this post on the ipad.

I had promised the triangle bunting tutorial for my lovely crochet class students.  I had spent the morning taking photos only to log on to find the very talented Lucy of attic24 (I'll add a link when I'm on my main computer) had posted a similar tutorial today.

So, class, pop over to Lucy for a wonderful tutorial and happy hooking :)

Sweet dreams Em xx

Tune in at the weekend for crochet class no 2, the half double crochet stitch ;)


Saturday, 18 May 2013

Daydreamers crochet lesson-No 1

Crochet Lesson No 1

To coincide with my fortnightly crochet class at Minerva I will be posting a tutorial on the Tuesday following the class.

This weeks lesson was 'How to Crochet a Granny Triangle Bunting'   


I absolutely love bunting so thought it would be a lovely idea to choose that. The tutorial for the bunting will be posted on Tuesday 21st as promised.

In the meantime I am planning a series of basic crochet tutorial.  These are here to help my absolute beginners ( in between classes) but anyone can have a go if they wish, do share the blog with your friends.

Get ready for lots and lots of photos and feel free to comment or ask questions.


Whenever I teach an absolute beginner I always suggest using a merchandised cotton yarn and a 4mm hook.   Wendy DK or Patons DK are excellent. They come in loads of lovely colours, the yarn doesn't split and its easy to see and identify individual stitches.  

Today we are going to be crocheting a very useful dishcloth using the UK double crochet stitch (dc).  I encourage my new student to crochet a dishcloth for each new stitch they are learning.  I find that the constant repetition really gets the action of each stitch stuck firmly in your head and you get a fabulous cloth to show off at the end of it :)

I will be crocheting along with you as I have just found a hole in my 2 year old crochet dish cloth :(


So grab your yarn and hook and lets get cracking

Step one is to form a slip knot in your yarn.  imagine tying a knot in your yarn but don't pull the tail all the way through, let it get caught.  The knot should move up the yarn as you tighten it.


Right, so you've got your knot...now wrap the yarn over the hook from back to front.  You may find that the slip knot spins on the hook, just hold your slip knot with your index finger of your right hand (right-handed folk only) and YOH with the left hand.


Pull the yarn through the slip stitch, 1 chain stitch on the hook


So to make a chain you continue in this way until you have the required amount
YOH, pull through.  YOH, pull through etc


For a double crochet dish cloth - chain 36
For this tutorial I will be using 10+1 chain stitches, its easier to photograph.


Now to begin the double crochet (dc).  Find the second chain from the hook, its got a needle stuck in it here. Don't count the one on the hook.


Insert your hook and YOH.

(Remember to hold the stitch on the hook with your index finger to stop it spinning, as your work grows you won't need to do this)

Pull your yarn through the chain stitch, 2 on the hook..........


YOH again.............


And pull yarn through both to leave you one stitch on the hook

Well done, you have completed a double crochet stitch.  Now do exactly the same in to each of the remaining 34 stitches. (Don't miss any, you only work into the '2nd chain from hook' right at the start)


At the end of the first row, count your stitches.  I have marked the 1st and 10th stitch with a needle (you are counting from right to left)

Now chain one
(thats just yarn over hook and pull yarn through)

This is called the turning chain, it ensures your work remains straight at the sides.


Turn your work and begin to dc into each stitch.  (Ignore the turning chain stitch)


Make sure you work the hook under both sides of the stitch as in the photo below.


Be careful, on the second row it is easy to miss the last stitch, so until you are use to it, count as you go.


This picture shows the 10 stitches and a chain (on the left hand side, just under the hook)


Its been stabbed with a needle here

Turn your work and dc across again. 

Continue until you have a lovely dishcloth approximately 8 inches square and, believe me, you won't forget how to do double crochet again :)


Here is the double crochet swatch.


 I promise to pop a picture of the finished dishcloth as soon as I've done it.  Feel free to post a photo of yours here when you are done.

I hope you enjoyed the tutorial, tune in next time for the half double crochet stitch.

sweet daydreams :)

Em x


WARNING! CROCHETING IS HIGHLY ADDICTIVE!


Thursday, 9 May 2013

Dreamy deleting.

If you have read my blog before you will have noticed that my first every post has disappeared!
"Where has it gone?" I hear you ask, well during one of my many daydreams I accidentally deleted it.
It had a lovely introduction to me and my blog as well as some very dreamy pictures, oh well!

So to start again ............

My name is Emily. I am a staff nurse on a very busy cardiac unit as well as a mother of two adorable children and a self confessed hooker (that's crochet).

I am off work at the mo on maternity leave, due to go back in September, boo hoo!  I have a tiny little ETSY shopHERE and i teach a crochet class at Minerva crafts in Darwen Lancashire.

To coincide with my crochet class I will be posting tutorials on every other Tuesday starting 21st May. They are intended for my students but please feel free to join in and message me if you need any help.

The first tutorial will be instructions to make a granny triangle bunting, just in time for summer.
You will need 3 balls of yarn in contrasting/complementing colours and a hook. I used DMC natura 100% cotton and a 3 mm hook.


Don't worry if you have never crocheted before, I will go through all the basic stitches before we start.  I may even do a complete beginners post prior to the bunting, if my 11 week old boy allows :)